Finally another technology tutorial!
This time I want to talk about creating a WebSocket Service with Spring Boot 2 (without the usage of STOMP). If you don’t know about STOMP, nevermind - we will create a solution working with plain WebSockets supported by all modern browsers.
In order to verify our setup, we also will create a minimal Web Frontend. This Frontend will consume the events sent via our WebSocket implementation.
The full code can be found on GitHub, in case you need a quick reference or just want to copy parts over.
What will we implement?
When I first came in contact with WebSockets, I was really blown away. The way you could write interactive actions using an event-driven approach was something I loved on first sight.
Truth be told, I have a feeling that compared to other frameworks, it is harder to set up a plain WebSocket connection in Spring Boot. But anyway, once you have done it - it is pretty straightforward.
So, what is our aim for this tutorial?
We want to build A Twitter Stream Web App.
In detail: A Spring Boot Service which will listen for Twitter updates. When it receives an update, it will push these informations to a Web Frontend using a WebSocket connection.
In fact, we want to decouple receiving tweets from pushing them to the Frontend. In my head is something like the following picture:
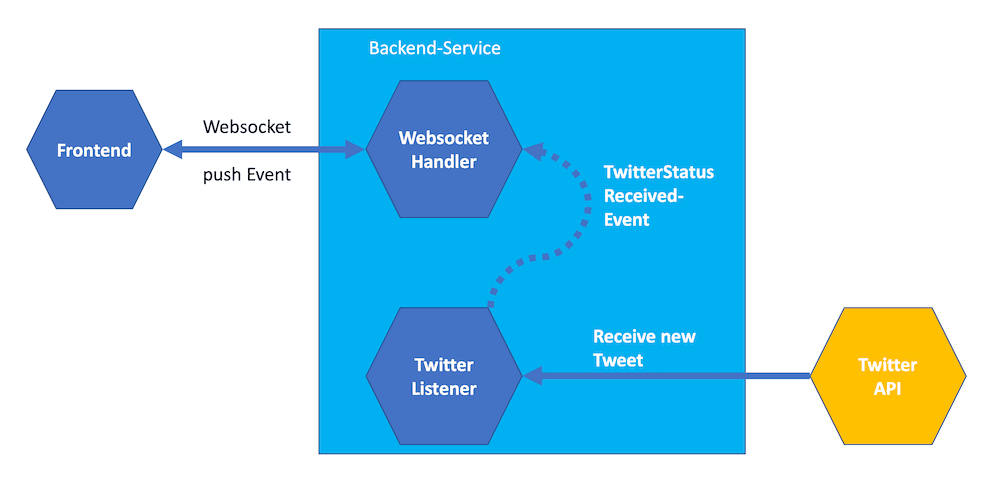
Websockets with Spring Boot 2
How do we start?
You might have guessed it - Let’s head over to start.spring.io - the Spring Initializer.
Dependencies are quite minimal:
- Lombok (for less boilerplate in our code)
- Either Web/Reactive Web - I have chosen Reactive Web
- WebSocket
Use a group/artifact name of your choice - I went with com.programmerfriend.websockets and twitterwebsockets.
After generating the project, import it in the IDE or editor of your choice. I am running with the wonderful IntelliJ IDEA.
Implement the Twitter Stream
Setting up Twitter
Since our service will interact with the Twitter API, we will need some API credentials. To get them, we need to create an Account at https://developer.twitter.com/.
Once done, we need to create an Application there: https://developer.twitter.com/en/apps. This will give us the credentials we need for setting up our Spring Boot Service.
Let’s interact with the Twitter API to get some tweets!
Writing a proper API integration can be really hard.
“I choose a lazy person to do a hard job. Because a lazy person will find an easy way to do it.”
Bill Gates
Since I don’t want to spend a lot of time building a Web Client for the Twitter API just now - I hit the web and found Twitter4J.
Twitter4J is an unofficial library for interacting with the Twitter API. On the code examples page (see #9 Streaming API) you see the code I used for this tutorial.
After attaining our API key, API secret key, Access Token and Access token secret from the previous step, we can start to implement our Twitter Stream Listener.
Add following dependency to your pom:
<groupId>org.twitter4j</groupId>
<artifactId>twitter4j-stream</artifactId>
<version>4.0.1</version>
Twitter4J needs the credentials to authenticate against the Twitter API. There are multiple ways of doing this, for the sake of simplicity I used the “twitter4j.properties” approach.
Create a twitter4j.properties file inside your resources folder.
Make sure to replace the placeholders with the actual credentials.
debug=true
oauth.consumerKey=<CONSUMER KEY>
oauth.consumerSecret=<CONSUMER SECRET>
oauth.accessToken=<ACCESS TOKEN>
oauth.accessTokenSecret=<ACCESS TOKEN SECRET>
If you want to use another approach for authenticating, have a look at the configuration docs of Twitter4J.
For now, using the twitter4j.properties file is fine, just make sure to NOT CHECK IT INTO VERSION CONTROL. I warned you!
Now, that the Library is setup correctly, we can start to write the Implementation.
Getting Tweets in our Application
My idea is to write a component which should receive the Tweets and transform them into Spring Internal Events. The internal events will later be triggers for sending messages to the Frontends.
Implementing it in this way really decouples the logic of receiving tweets from the logic to send the tweets to our Frontends.
Let’s start with the component receiving the tweets and transforming them into an internal event.
Here is the code of our TwitterListener:
@Component
@Slf4j
public class TwitterListener implements StatusListener {

    private ApplicationEventPublisher applicationEventPublisher;

    public TwitterListener(ApplicationEventPublisher applicationEventPublisher) {
        this.applicationEventPublisher = applicationEventPublisher;
    }

    @Override
    public void onException(Exception e) {
    }

    @Override
    public void onStatus(Status status) {
        log.info("Received new Status: {}", status);
        TwitterStatusReceived twitterStatusReceived = new TwitterStatusReceived(this, status);
        applicationEventPublisher.publishEvent(twitterStatusReceived);
        log.info("Emitted event for Status with id {}", status.getId());
    }

    @Override
    public void onDeletionNotice(StatusDeletionNotice statusDeletionNotice) {
    }

    @Override
    public void onTrackLimitationNotice(int i) {
    }

    @Override
    public void onScrubGeo(long l, long l1) {
    }

    @Override
    public void onStallWarning(StallWarning stallWarning) {
    }
}
It implements Twitter4J’s StatusListener interface to act as a Listener for Tweets.
Also, we inject ApplicationEventPublisher to emit our internal event using Spring Events.
The onStatus method is where our real code lives: There we create our internal TwitterStatusReceived-event which will contain the status-object.
See the definition of the TwitterStatusReceived-class:
@Getter
public class TwitterStatusReceived extends ApplicationEvent {

    private final Status status;

    public TwitterStatusReceived(Object source, Status status) {
        super(source);
        this.status = status;
    }
}
Sadly this is not enough since our TwitterListener is not yet properly registered.
We need to set up the Twitter Stream and add our listener to it.
@Configuration
public class TwitterStreamConfig {

    @Autowired
    TwitterListener twitterListener;

    @PostConstruct
    public void setupTwitterStream() {
        TwitterStream twitterStream = new TwitterStreamFactory().getInstance();

        FilterQuery tweetFilterQuery = new FilterQuery();
        tweetFilterQuery.track(new String[]{"Elon Musk", "Space X"});
        tweetFilterQuery.language(new String[]{"en"});

        twitterStream.addListener(twitterListener);
        twitterStream.filter(tweetFilterQuery);
    }
}
This code will set up our TwitterStream to track the terms Elon Musk and Space X.
Also, we have set the language to English and added our twitterListener as a listener to the Stream.
After we set this up, we should be able to start the application and watch the logs fill up with tweets about Elon Musk and the Space X project.
Setting up the WebSocket
In order to pass our Tweets to the Frontends, we need to create a component which is capable of two things: receiving our Tweet Events and passing the content of the events to the Frontends using a WebSocket.
To be able to receive our Tweet Events the component has to implement the ApplicationListener-interface.
The onApplicationEvent-method is responsible of handling the events, there we will write the events to all our WebSocket connections.
By extending from the TextWebSocketHandler, we get a lot of helpful methods for handling the connection state.
After a client connects, we need to store the session. We do this because when we later want to write to the socket we need a reference.
Have a look at the full implementation of our WebsocketHandler:
@Component
@Slf4j
public class WebsocketHandler extends TextWebSocketHandler implements ApplicationListener<TwitterStatusReceived> {

    private Map<String, WebSocketSession> sessions = new ConcurrentHashMap<>();
    private ObjectWriter objectWriter;

    public WebsocketHandler(ObjectMapper objectMapper) {
        this.objectWriter = objectMapper.writerWithDefaultPrettyPrinter();
    }

    @Override
    public void handleTransportError(WebSocketSession session, Throwable throwable) throws Exception {
        log.error("error occured at sender " + session, throwable);
    }

    @Override
    public void afterConnectionClosed(WebSocketSession session, CloseStatus status) throws Exception {
        log.info(String.format("Session %s closed because of %s", session.getId(), status.getReason()));
        sessions.remove(session.getId());
    }

    @Override
    public void afterConnectionEstablished(WebSocketSession session) throws Exception {
        log.info("Connected ... " + session.getId());
        sessions.put(session.getId(), session);
    }

    @Override
    protected void handleTextMessage(WebSocketSession session, TextMessage message) throws Exception {
        log.info("Handling message: {}", message);
    }

    private void sendMessageToAll(String message) {
        TextMessage textMessage = new TextMessage(message);
        sessions.forEach((key, value) -> {
            try {
                value.sendMessage(textMessage);
                log.info("Send message {} to socketId: {}", message, key);
            } catch (IOException e) {
                e.printStackTrace();
            }
        });
    }

    @Override
    public void onApplicationEvent(TwitterStatusReceived twitterStatusReceived) {
        try {
            String msg = objectWriter.writeValueAsString(twitterStatusReceived);
            sendMessageToAll(msg);
        } catch (JsonProcessingException e) {
            e.printStackTrace();
        }
    }
}
There is one step missing: We still need to configure the WebSocket properly within Spring Boot.
I solved this by creating a Configuration with the @EnableWebSocket-annotation on top of it.
We let the Configuration implement the WebSocketConfigurer-interface.
The interface brings the registerWebSocketHandlers which allows registering our earlier implemented WebsocketHandler to the /tweets-Endpoint. We also allowed all origins (don’t do this on production), since this makes things easier while developing from different ports and endpoints on a local machine.
Here the full code of the Configuration class:
@Configuration
@EnableWebSocket
public class WebSocketConfig implements WebSocketConfigurer {

    @Autowired
    WebsocketHandler websocketHandler;

    @Override
    public void registerWebSocketHandlers(WebSocketHandlerRegistry webSocketHandlerRegistry) {
        webSocketHandlerRegistry.addHandler(websocketHandler, "/tweets").setAllowedOrigins("*");
    }
}
Hey! Your Application should now be ready to serve clients from ws://localhost:8080/tweets.
If you hit the link with your browser, you will probably get an error Can "Upgrade" only to "WebSocket".
This is because browsers not open WebSockets by default, this needs a proper client.
Since we not yet implemented a real client it is hard to verify our implementation.
You can do a quick smoke test by entering following code snippet into the Chrome Console:
var webSocket = new WebSocket('ws://localhost:8080/tweets');
webSocket.onmessage = function(data) { console.log(data); }
This snippet establishes a WebSocket connection and logs out each received message on the Chrome Console (should work similarly on other browsers).
Building a “real” frontend
Don’t get me wrong. Frontend work is really important. Still, I feel that this is not really the scope of this tutorial.
For the sake of completeness, I added two Frontends in the GitHub Repository.
One is served together with the Application we just created.
It consists of two files in the static-folder of our Spring Boot Application (see here).
This frontend just adds a new table row for each new event it receives. After starting the service it can be reached on http://localhost:8080/index.html.
The other Frontend was built using React. It is stored in the twitter-frontend-folder and can be started running npm start.
In this tutorial, I just want to cover the easy one. If the demand is there I probably can also write a guide covering the React version.
Building our WebSocket Client Frontend
We already built a service sending information about new Tweets through a WebSocket Connection. Now we need to build the client-facing web application for it.
To finish our project we will execute the following steps:
- Create a file called
index.htmlinsideresources/static. - In this file add a
tablewhich will contain our tweets - Reference our Javascript file
app.js - Call a method called
connect()to connect and listen to the Websocket Events - Create a file called
app.js - Implement the
connect-function- Make it connect to the WebSocket
- Upon receiving an event, update the UI (add a row to the previously mentioned table)
Here is the index.html, I created.
<!DOCTYPE html>
<html>
<head>
  <title>Hello WebSocket</title>
  <script src="/app.js"></script>
</head>
<body>
<noscript><h2 style="color: #ff0000">Seems your browser doesn't support Javascript! Websocket relies on Javascript being
  enabled. Please enable
  Javascript and reload this page!</h2></noscript>
<div class="col-md-12">
  <table id="conversation" class="table table-striped">
    <thead>
    <tr>
      <th>ID</th>
      <th>message</th>
    </tr>
    </thead>
    <tbody id="messages">
    </tbody>
  </table>
</div>
</body>
<script>
  connect();

</script>
</html>
And here the JavaScript file app.js:
function connect() {
  ws = new WebSocket('ws://localhost:8080/tweets');
  ws.onmessage = function (data) {
    console.log(data);
    addToUi(data.data);
  }
}

function addToUi(message) {
  var jsonMsg = JSON.parse(message);
  document.querySelector('#messages').innerHTML += "<tr><th>" + jsonMsg.status.id + "</th><th>"+jsonMsg.status.text+"</th></tr>";
}
This is not an implementation using best standards - but it works. There are probably better tutorials on writing a Web Frontend to consume a WebSocket Connection.
When you start your Service again, you should be able to access the UI on http://localhost:8080/index.html.
When you have chosen a good topic in your TwitterStreamConfig you should see a few Tweets here and there.
The git repository of this tutorial also contains a ReactJS frontend (see here).
Recap
I hope you enjoyed the tutorial as much as I did writing the code myself. You created a Websocket Application which is streaming Tweets in real-time to your Web Frontend using a Websocket connection.
If you have any further questions, feel free to write a comment down below or just drop me a tweet on Twitter/@eiselems.
All of the Code of this tutorial (and more!) can be found on GitHub.
About the Author: