This article is inspired by a solution we needed at work: We needed a way to retry asynchronous operations using Spring Boot and RabbitMQ.
WHY?
Sometimes it is necessary to execute certain operations decoupled from the rest of your business logic. We needed to send an update to an external system (e.g. an audit log). The update itself is not necessary for the operation of our own user flows. The user should not be aware of failures. This is why we decided to build it using messaging.
Since the update is really important, we need to make sure that the event arrives at the external system - even if the external system is currently not available.
The Requirements
- The creation of the update should be isolated from the rest of our implementation.
- If the update fails (for whatever reason) it should be sent again later
- The time between each retry should be 1 hour
Planning the Solution
Since we already wanted to use RabbitMQ for receiving the internal trigger for the update - why not try to build the retry behavior on top of it?
A bit of RabbitMQ
This article assumes quite a bit of knowledge about RabbitMQ (e.g. about Exchanges, Queues, and Bindings). If you need a start on these topics, the RabbitMQ Documentation is really good!
Despite the disclaimer about the previous knowledge I want to quickly explain two mechanics which are quite essential for understanding this tutorial
TTL
When you define a TTL (Time-to-live) on a queue, it will drop messages which have been kept for longer than the defined TTL.
Dead-Lettering
DLE (Dead Letter Exchanges) and DLQ (Dead-Letter-Queues) are both something you can configure as a policy for all queues or manually per queue. Dead-Lettering defines what should happen with messages that get rejected by a consumer. When RabbitMQ uses the dead-letter-mechanic, it passes the message to a specific exchange and/or routing-key and adds some meta-data about the dead-letter-process (e.g. how often the message was already dead-lettered).
Poison Messages
Poison Messages are messages that can not get consumed and cause havoc in your system. In the worst case, it is a message that crashes your consumer. If the listeners are not correctly configured all clients can try to consume the messages and instance after instance crashes. Poison Messages are one of the reasons why you should think about DLEs and DLQs.
The principle
The idea is that we can build a retry mechanism by combining the DLQ and TTL feature. But how could this be achieved?
Have a look at the following sketch:
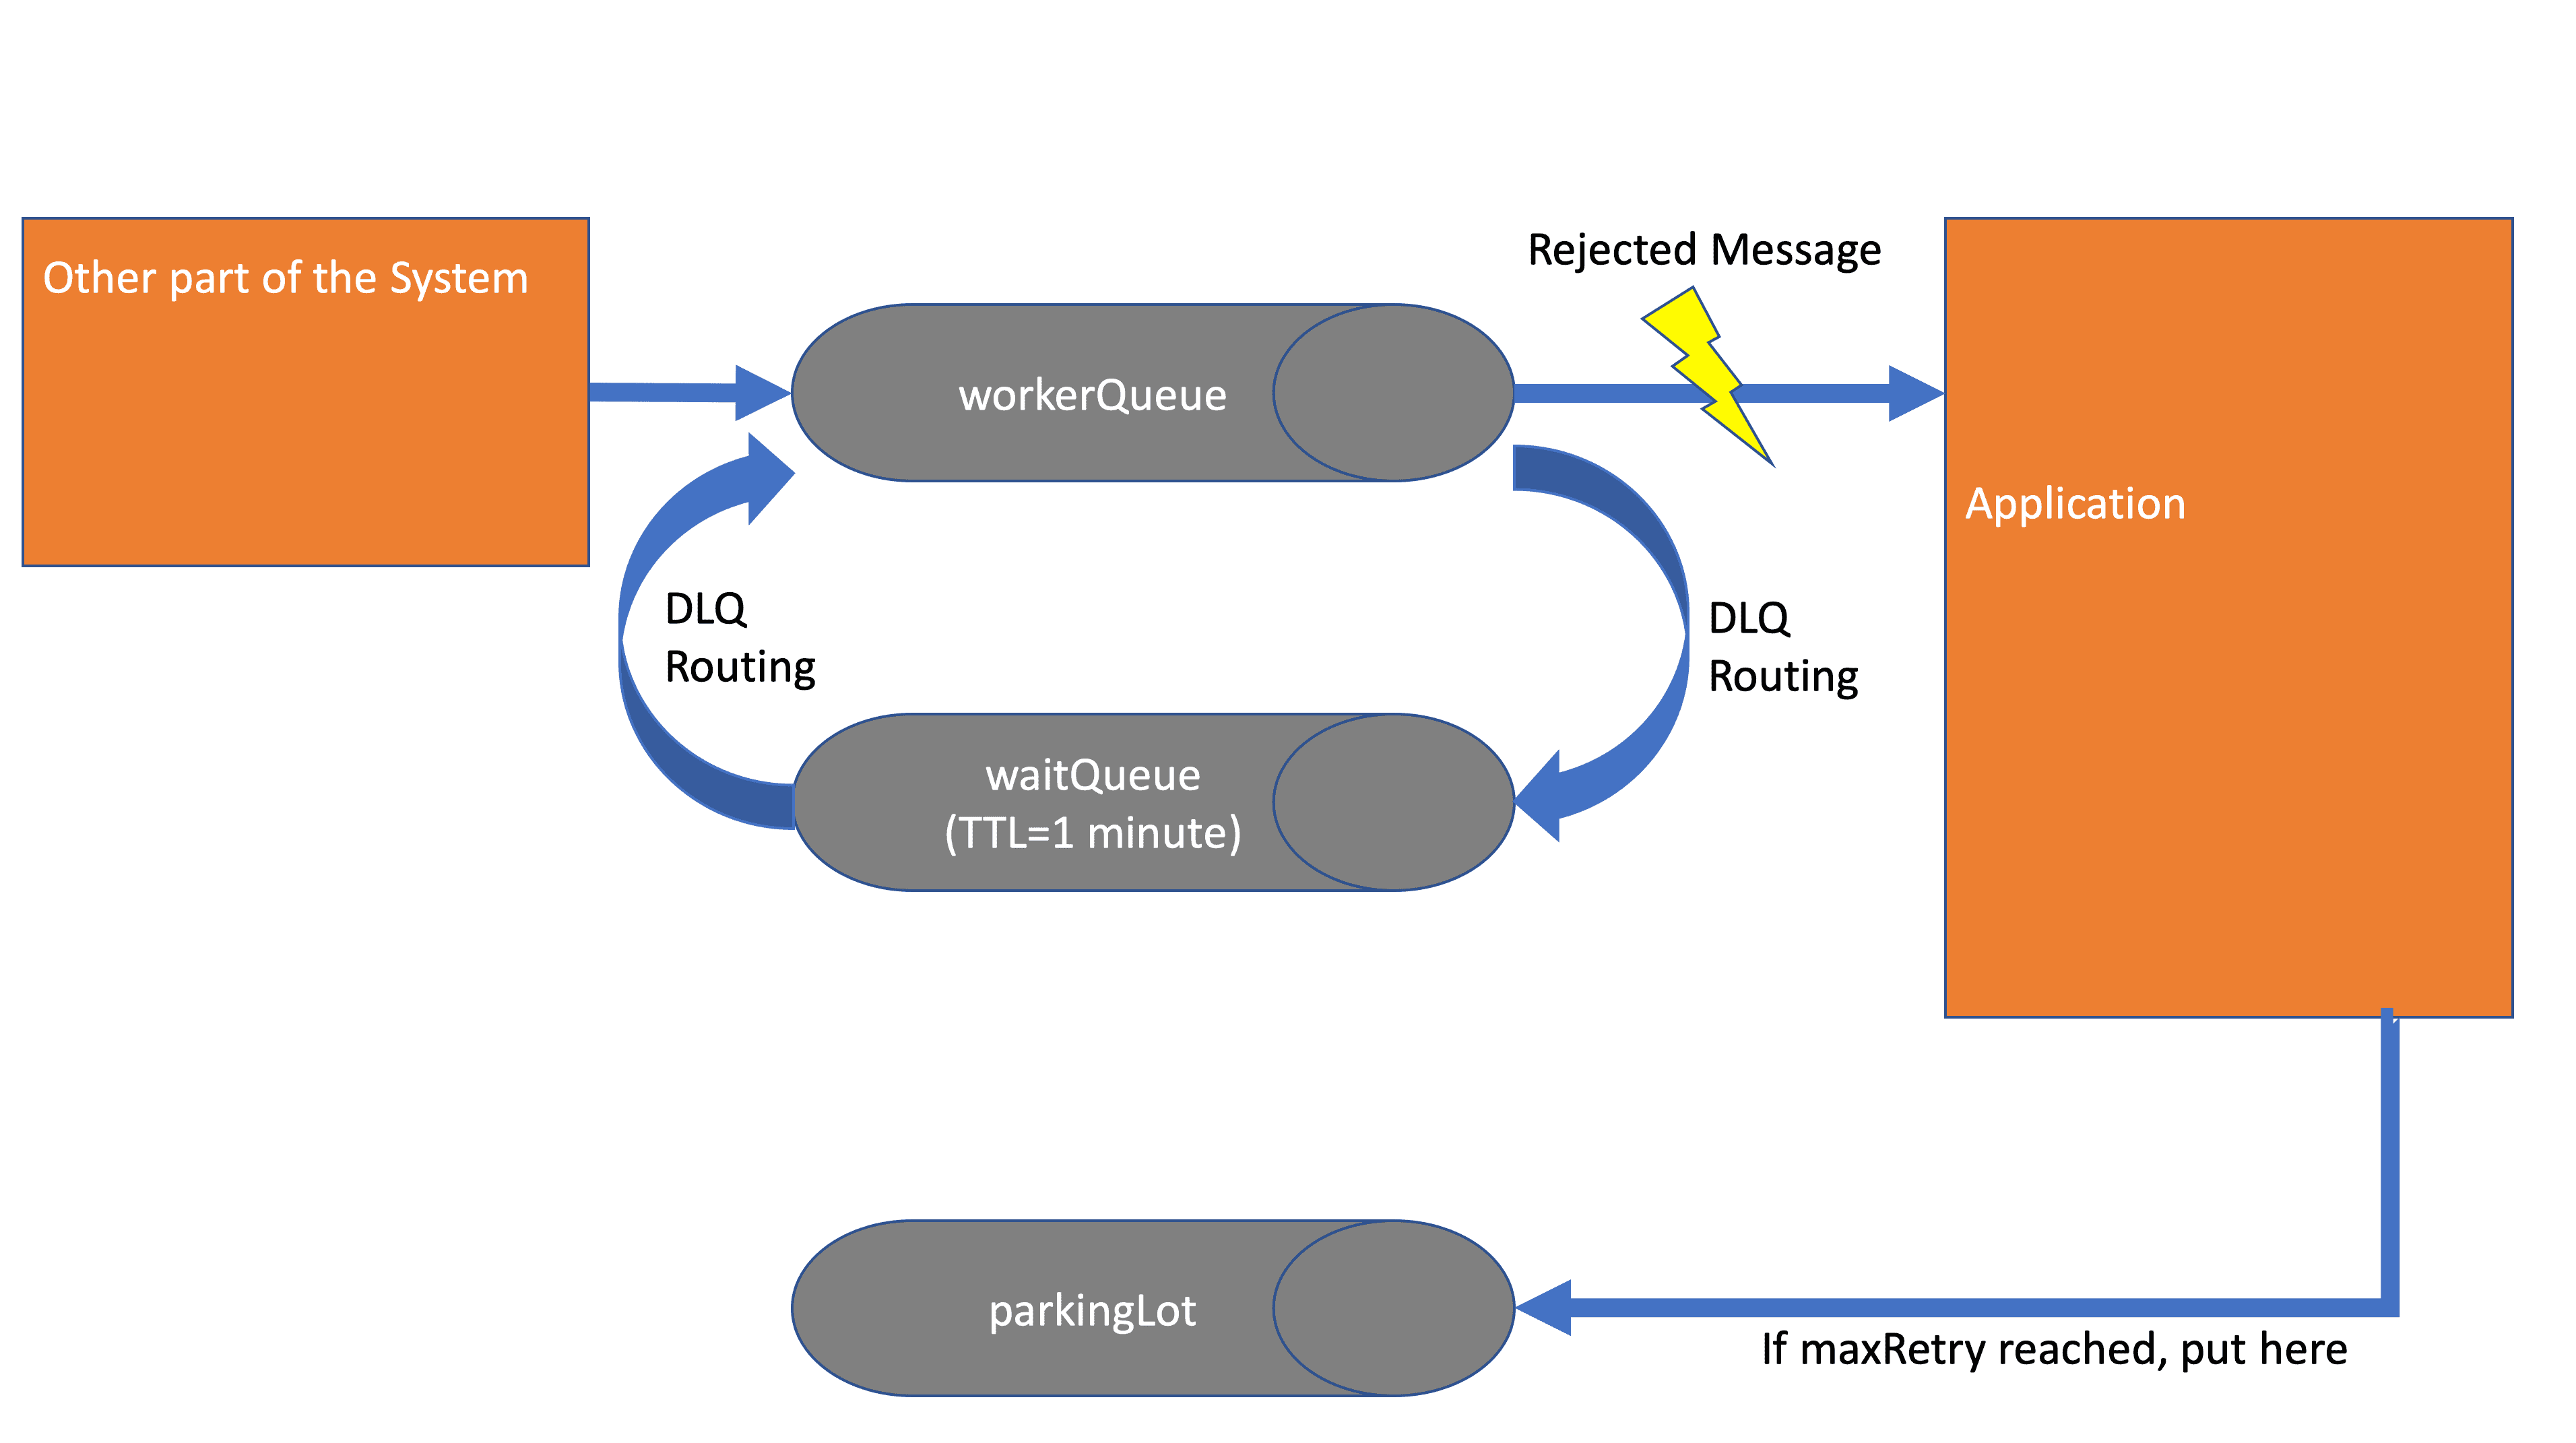
What do we see here?
- WorkerQueue: The queue which contains our internal event to trigger the update to the external system. Our Application is bound to it and consumes all messages. It has a DLQ configuration to pass rejected messages to the WaitQueue.
- WaitQueue: Most of the magic lives here: It has no active listener bound, but a TTL of 1 minute and a DLQ configuration. With this in place, it will forward all messages which it receives after 1 minute to the defined DLQ. We use this to put our messages back into the WorkerQueue after 1 minute.
- ParkingLot: When an update didn’t make it after all Retries got executed - we put it in the parkingLot so that we can have a manual look why the messages were not able to get processed. The application could also contain a logic to publish here directly to get rid of poison messages.
Let’s code this!
Setting up our project
Use the spring-initializer, the web-version is available at http://start.spring.io.
There create a service that has the only dependencies: Spring for RabbitMQ.
Connecting to RabbitMQ and creating the necessary Queues
Thankfully the autoconfiguration is doing a lot of things. If you run with the default credentials of RabbitMQ you don’t even need to setup anything.
Having spring-amqp on the classpath is enough to connect your application to RabbitMQ.
In case you don’t have the default credentials, feel free to configure the credentials in the application.properties.
When you are already there, disable the default requeue behaviour by adding spring.rabbitmq.listener.simple.default-requeue-rejected=false.
spring.rabbitmq.password=$$$$
spring.rabbitmq.username=Admin

spring.rabbitmq.listener.simple.default-requeue-rejected=false
Time to define our queues and bindings.
With spring-amqp you can easily define your queues in your application code.
As you have seen in the chart, we need an exchange, a few queues, and a few bindings.
@Configuration
public class RabbitConfiguration {

    private static final String EXCHANGE_NAME = "tutorial-exchange";
    public static final String PRIMARY_QUEUE = "primaryWorkerQueue";

    private static final String WAIT_QUEUE = PRIMARY_QUEUE + ".wait";

    public static final String PARKINGLOT_QUEUE = PRIMARY_QUEUE + ".parkingLot";

    private static final String PRIMARY_ROUTING_KEY = "primaryRoutingKey";

    @Bean
    DirectExchange exchange() {
        return new DirectExchange(EXCHANGE_NAME);
    }

    @Bean
    Queue primaryQueue() {
        return QueueBuilder.durable(PRIMARY_QUEUE)
            .deadLetterExchange(EXCHANGE_NAME)
            .deadLetterRoutingKey(WAIT_QUEUE)
            .build();
    }

    @Bean
    Queue waitQueue() {
        return QueueBuilder.durable(WAIT_QUEUE)
            .deadLetterExchange(EXCHANGE_NAME)
            .deadLetterRoutingKey(PRIMARY_ROUTING_KEY)
            .ttl(10000)
            .build();
    }

    @Bean
    Queue parkinglotQueue() {
        return new Queue(PARKINGLOT_QUEUE);
    }

    @Bean
    Binding primaryBinding(Queue primaryQueue, DirectExchange exchange) {
        return BindingBuilder.bind(primaryQueue).to(exchange).with(PRIMARY_ROUTING_KEY);
    }

    @Bean
    Binding waitBinding(Queue waitQueue, DirectExchange exchange){
        return BindingBuilder.bind(waitQueue).to(exchange).with(WAIT_QUEUE);
    }

    @Bean
    Binding parkingBinding(Queue parkinglotQueue, DirectExchange exchange) {
        return BindingBuilder.bind(parkinglotQueue).to(exchange).with(PARKINGLOT_QUEUE);
    }

}
This should be enough to build something similar to what we had in our sketch. A short recap of what we defined here:
- a
direct exchangefor our queues - our
primary worker queuewhich will dead-letter its messages to thewait queue - the
wait queue, which has a TTL of 10 seconds (10000ms) and dead-letters its messages to theprimary worker queue - the
parking lot queue - the correct bindings for all of them
Building the retry logic
As seen in the chart we need one listener for the primary worker queue.
Also, we will publish messages to the parking lot queue.
Creating the listener is easily done by just using the @RabbitListener annotation and specifying the queue name.
Publish to an exchange using a RoutingKey is easily be done by interacting with RabbitTemplate and its send-method.
@Component
public class RetryingRabbitListener {

    private Logger logger = LoggerFactory.getLogger(RetryingRabbitListener.class);

    private RabbitTemplate rabbitTemplate;

    public RetryingRabbitListener(RabbitTemplate rabbitTemplate) {
        this.rabbitTemplate = rabbitTemplate;
    }

    @RabbitListener(queues = PRIMARY_QUEUE)
    public void primary(Message in) throws Exception {
        logger.info("Message read from workerQueue: " + in);
        if (hasExceededRetryCount(in)) {
            putIntoParkingLot(in);
            return;
        }
        throw new Exception("There was an error");
    }

    private boolean hasExceededRetryCount(Message in) {
        List<Map<String, ?>> xDeathHeader = in.getMessageProperties().getXDeathHeader();
        if (xDeathHeader != null && xDeathHeader.size() >= 1) {
            Long count = (Long) xDeathHeader.get(0).get("count");
            return count >= 3;
        }

        return false;
    }

    private void putIntoParkingLot(Message failedMessage) {
        logger.info("Retries exeeded putting into parking lot");
        this.rabbitTemplate.send(PARKINGLOT_QUEUE, failedMessage);
    }
}
This should be enough to implement the flow of our charts. The only interesting thing that happens here is that we read the count from the first xDeathHeader element. When a message is affected by a dead-letter-mechanic, rabbitMQ adds an entry in the xDeathHeader-Array. This array has an entry for each Queue on which a message was dead-lettered. Since our messages will only pass one Queue, it is fine to just check the first element. If you want to be safe, you could find the correct array element by filtering for the queueName. If you want to learn more about the internal mechanics of RabbitMQ, the documentation is again really good.
Let’s head over to the Application class and modify it a bit to generate regularly some messages.
@SpringBootApplication
public class ReliableRabbitmqAmqpApplication implements CommandLineRunner {

    public static void main(String[] args) {
        SpringApplication.run(ReliableRabbitmqAmqpApplication.class, args);
    }

    @Autowired
    RabbitTemplate rabbitTemplate;

    @Override
    public void run(String... args) throws Exception {
        do {
            rabbitTemplate.convertAndSend("tutorial-exchange", "primaryRoutingKey", "Hello, world!");
            Thread.sleep(60000);
        } while (true);
    }

}
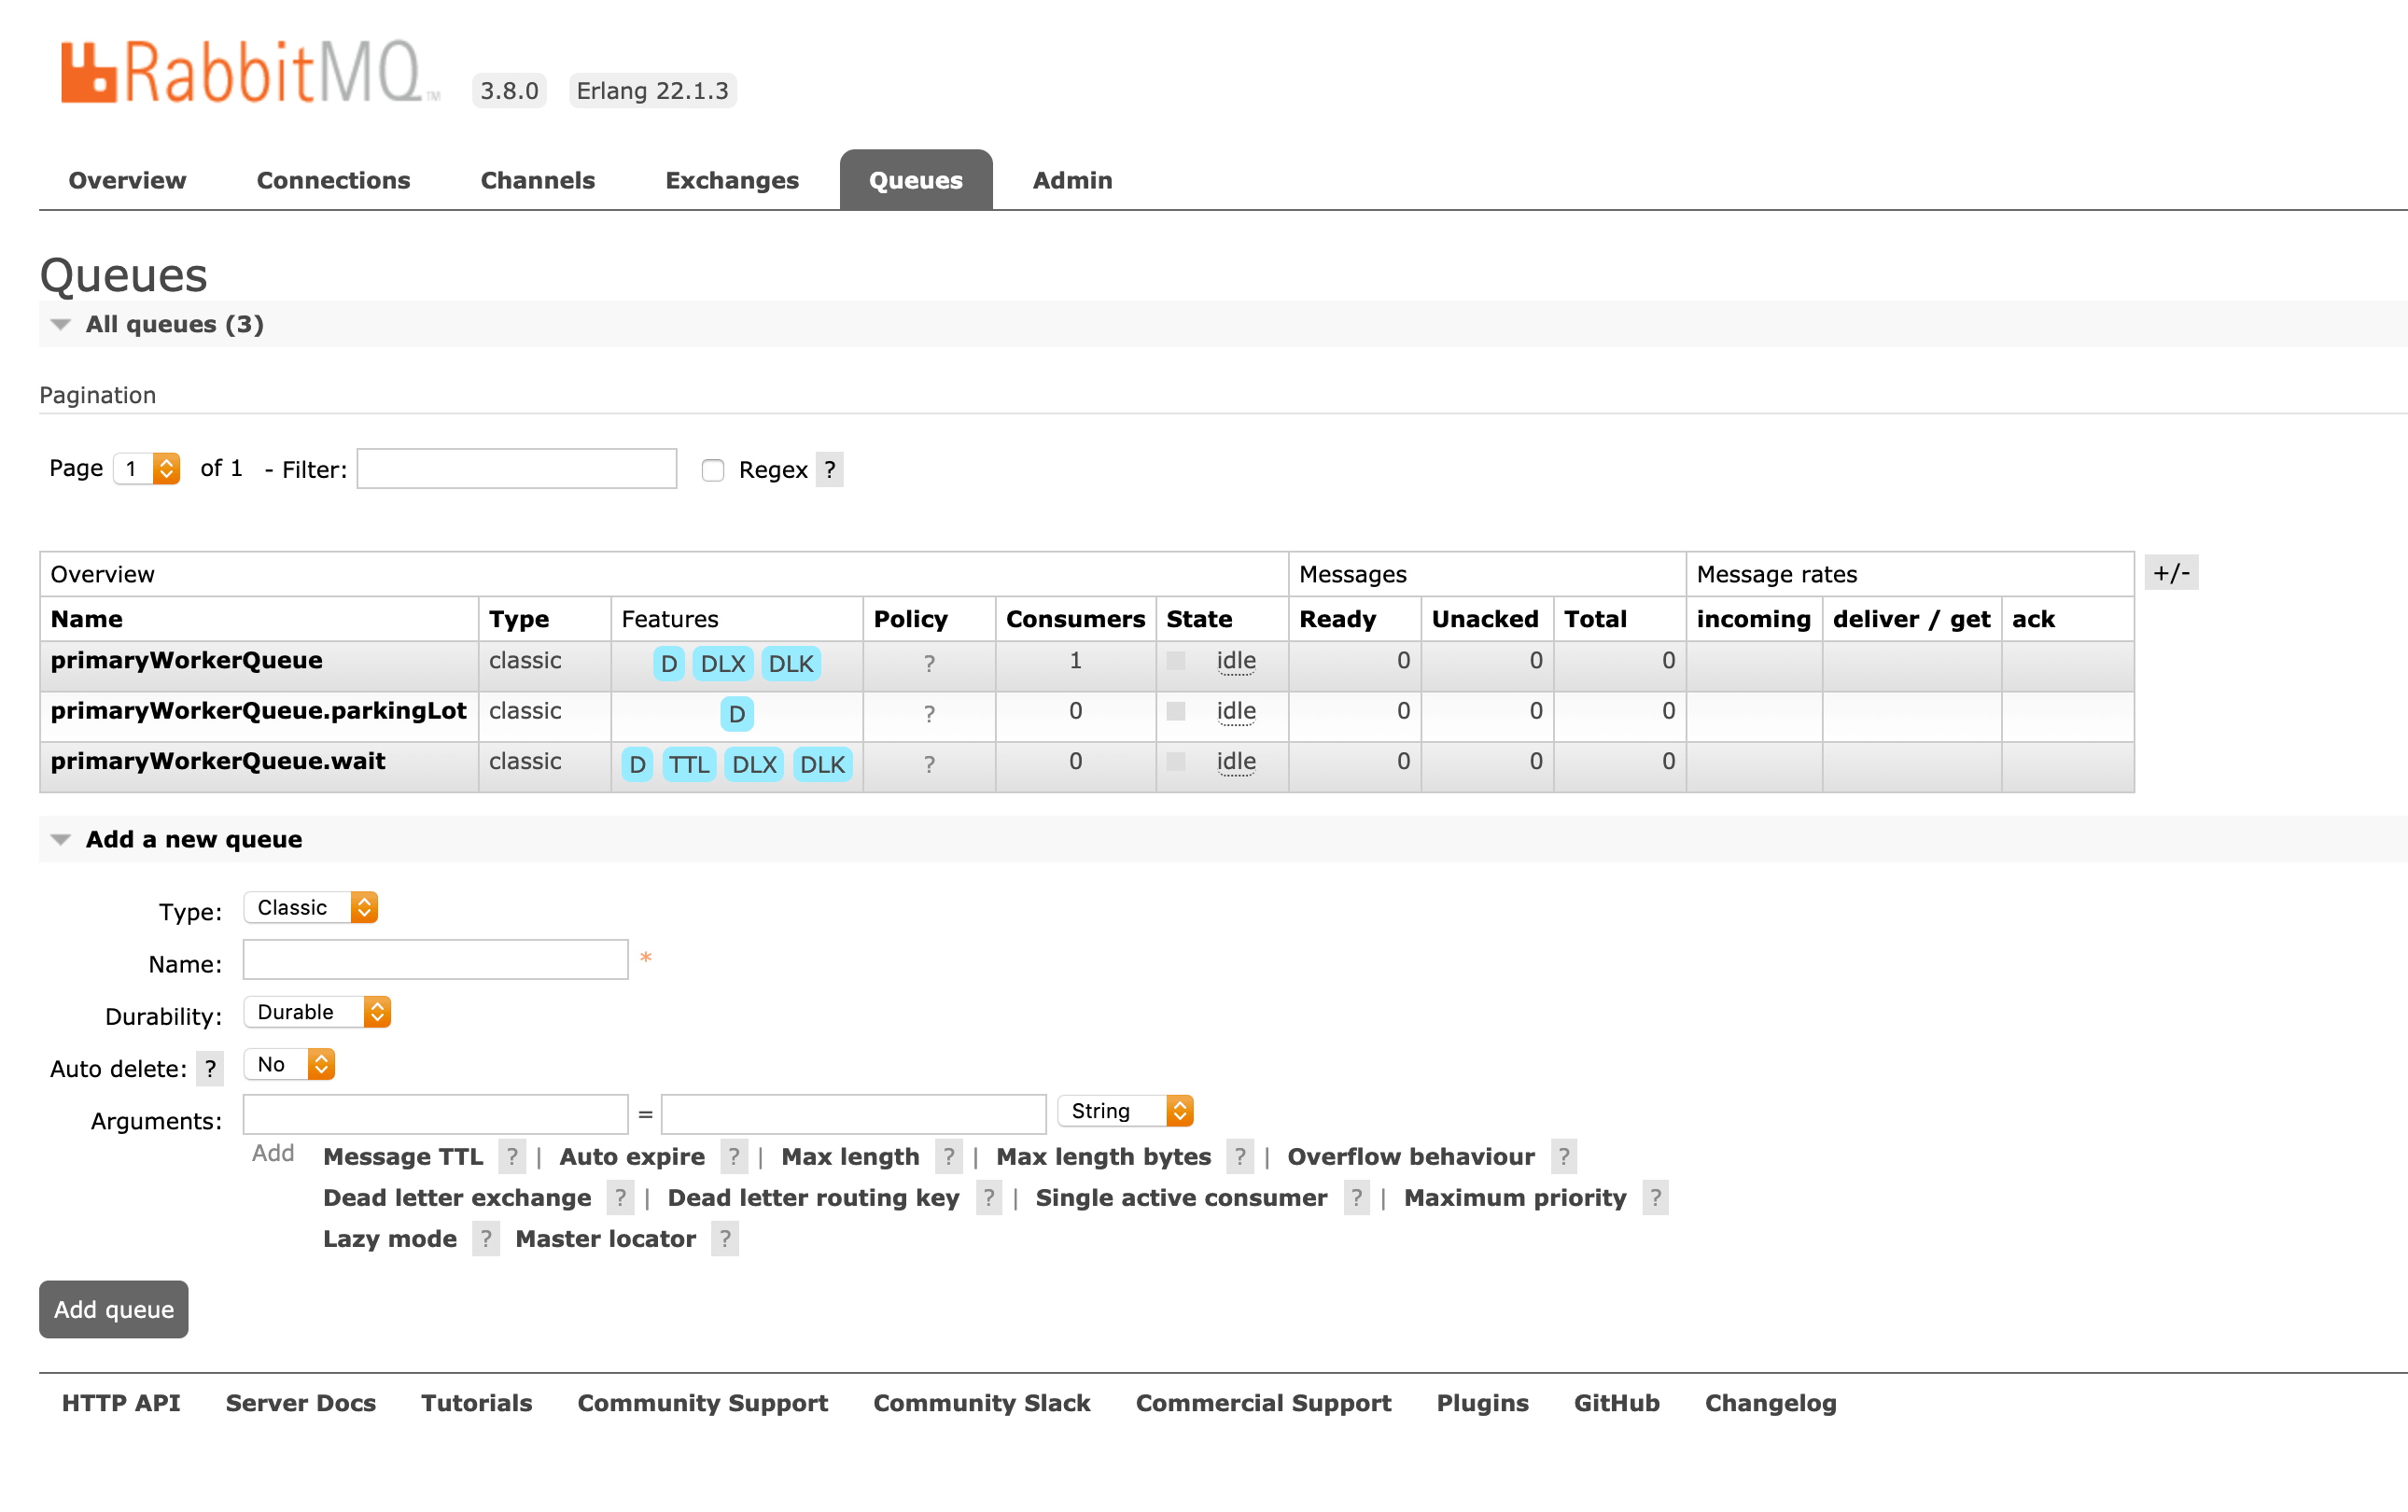
Now you can start the application and watch it doing its thing - either in the logs or on http://localhost:15672/#/queues.
You should see how the application create a message each minute. The message passes the primary worker queue and the wait queue. Due to us not implementing a success case, all messages end up in the parkinglot queue.
Recap
So what did we do?
We built a retrying consumer using RabbitMQ. We have the possibility to take a look at the messages which we were not able to deliver since they end up in the parkinglot queue.
I hope you liked this tutorial and you learned something. The working application can be found on GitHub.
Footnote
Why didn’t you just use the built-in retry of spring-amqp?
Yes, I am aware of the retry available within spring-amqp.
In the repository of this tutorial, there is also an example where I used it to implement the retry (see: https://github.com/programmerfriend/spring-boot-reliable-rabbitmq/tree/master/spring-amqp-retry).
Overall it is:
- using only configuration
- only requiring one additional queue (parkingLot)
- well known by other developers
So, let me tell you why I didn’t use it:
The problem I have with it is that it is blocking the RabbitListener while waiting for the retry.
In our use-case, we have a wait between retries of one hour. A single message would block the whole listener for one hour.
In order to improve this, we could increase the number of available listeners (either via concurrency or just adding more application instances) but the cure is probably not much better than the disease here. Even with more listeners, you could block all of them - we would just need more messages now.
Also: If you encounter this behaviour in production, it is really hard to debug. Out of a sudden, you might be having a lot of exceptions and then no logs at all - while all messages start piling up in the queues.
I am not against using the built-in retry mechanism. I would just not use it for long times between retries.
Again thanks for your time finishing this tutorial, I hope you learned a lot. Feel free to leave a comment.
About the Author: