This article will be about writing proper Integration Tests with Spring Boot 2.
In my opinion Integration Tests should be as similar as possible to the production environment. Due to this, an embedded H2 is not cutting it.
I sat on this exact problem when bootstrapping our latest project at work. In the past, we just went with the embedded H2 and were quite happy. The only complaints we had: Sometimes we used a syntax which was working on H2 but not on our Production MariaDB instance. Mostly it was about creating indexes and tables within Flyway.
Since our current project will be using a specific extension of PostgreSQL - H2 was not an option. H2 is not even supporting the custom methods provided by the database and is therefore not able to perform the queries our service will be doing.
Technically we also could have mocked the Persistence Layer altogether in order to make our tests run. My problem with this was that a lot of logic is done on the database side.
Introducing mocks there is creating a false sense of safety. If anything on the persistence layer is not working as it should, the tests will not catch it!
What you need for following along
- Working Docker Environment
- Optional: local PostgreSQL installation (makes it easier to verify the implementation while following along)
- Optional: Experience with PostgreSQL
What makes a good integration test?
- Used technology should be close to production
“Keep development, staging, and production as similar as possible” (as stated on The Twelve-Factor App - Dev-Prod Parity ). - Tests should not depend on a pre-configured database (e.g. local installation on the developer’s box)
What this means for our Spring Boot Integration Test
- It should use the same database as in production
- The Test itself has to manage the database
- We want to use Flyway to define our schema for the production database - the schema of the test database has to be set up in the same way
- Code should be easy to read/write
I have to admit, I was really scratching my head on how to do this. While researching a bit on the internet, I came along some brilliant and perfect solution for our issue here.
TestContainers!
TestContainers is according to their GitHub page “a Java 8 library that supports JUnit tests, providing lightweight, throwaway instances of common databases, Selenium web browsers, or anything else that can run in a Docker container”.
Let’s make them work in an example!
- Code a service which is giving us information about employees from a (PostgreSQL) database.
- There should be a REST Controller which exposes our data for other people to consume.
- There should be an Integration Test verifying if the Interaction with the Database works.
Implementation
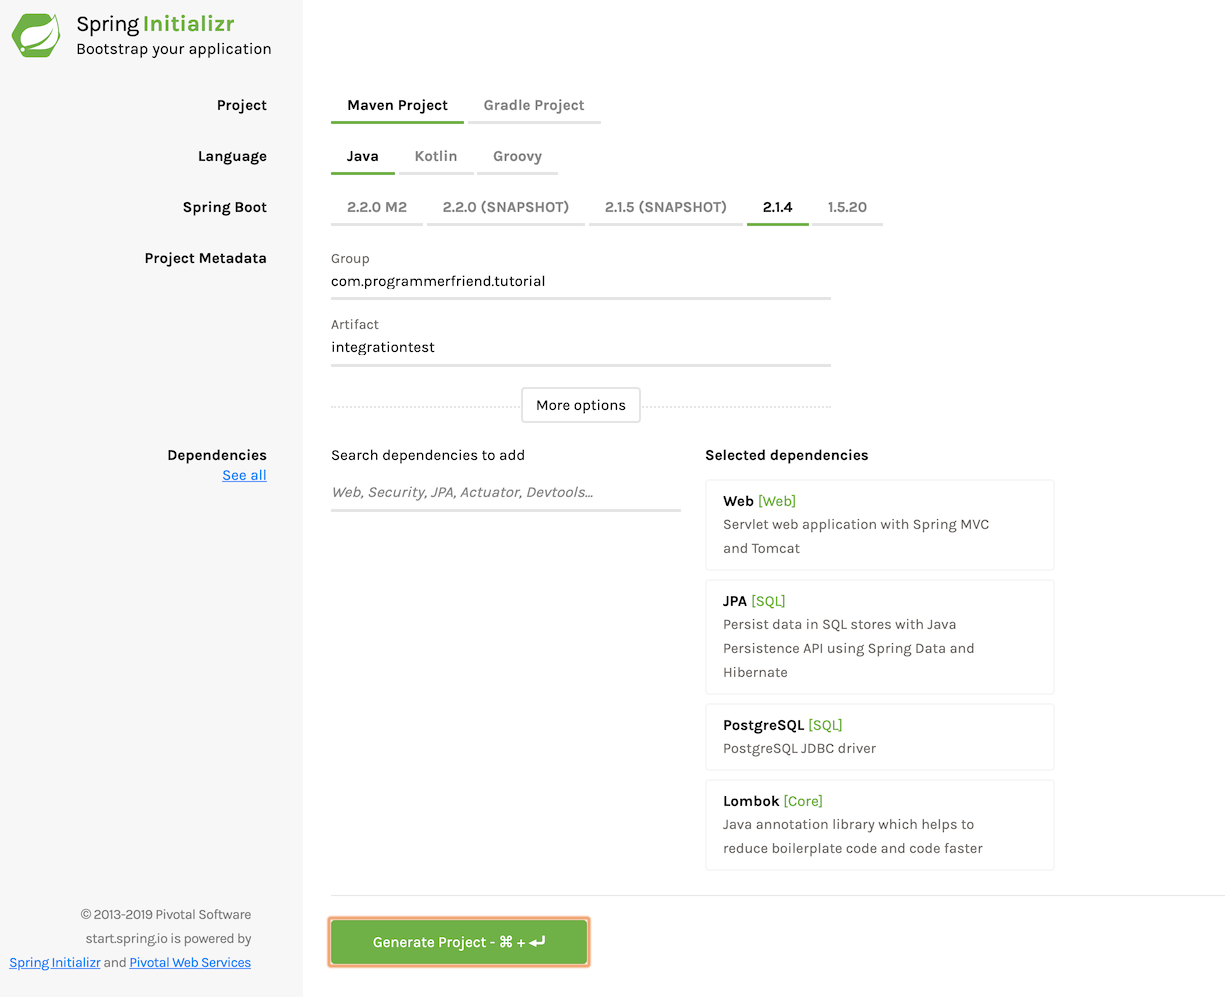
- Generate service on https://start.spring.io.
As dependencies, we want to have:
Web,JPA,PostgreSQLandLombok.
- Import the Project into the IDE / Editor of your choice to get your hands dirty. For me, it will be IntelliJ IDEA.
The service implementation
I agree, the proper way of doing this now would be to make a mix of writing Tests followed by implementing the real logic. Sadly, this would make this tutorial pretty hard to follow. Keep Test-Driven-Development for another article.
Let’s make the service access the Database.
We start modifying the IntegrationTestApplication:
- Add
@EnableJpaRepositorieson top of the class. Unsurprisingly this will enable JpaRepositories. JpaRepositories are a great way to save a lot of boilerplate code. They allow interacting with the database with minimal coding effort. - Add a
RestControllerwhich exposes our model directly to the world (not a good thing - but good enough for this tutorial).
@RestController
@AllArgsConstructor
class EmployeeController {
    private EmployeeRepository employeeRepository;

    @GetMapping("/employees")
    public List<Employee> getEmployees() {
        return employeeRepository.findAll();
    }
}

@Data
@Entity
class Employee {
    @Id
    @GeneratedValue
    private Long id;
    private String firstName;
    private String lastName;
}
Don’t get confused by the EmployeeRepository which we not yet have created.
What you see is a basic RestController which is returning information about all Employees it knows from the EmployeeRepository.
Interacting with the database
There are a few steps necessary for interacting with the Postgresql Database:
This all assumes that you have a PostgreSQL Instance running and reachable on localhost:5432.
We assume the user/password combination is postgres/docker.
Since this tutorial is not about installing PostgreSQL but about testing it, we will skip the installation of PostgreSQL.
1. Connect our Service to PostgreSQL: Update the application.properties
## Spring DATASOURCE (DataSourceAutoConfiguration & DataSourceProperties)
spring.datasource.url=jdbc:postgresql://localhost:5432/postgres
spring.datasource.username=postgres
spring.datasource.password=docker

# The SQL dialect makes Hibernate generate better SQL for the chosen database
spring.jpa.properties.hibernate.dialect = org.hibernate.dialect.PostgreSQLDialect
# fixes> Caused by: java.sql.SQLFeatureNotSupportedException: Method org.postgresql.jdbc.PgConnection.createClob() is not yet implemented.
spring.jpa.properties.hibernate.jdbc.lob.non_contextual_creation=true


# Hibernate ddl auto (create, create-drop, validate, update)
spring.jpa.hibernate.ddl-auto = update
I don’t want to get too much into detail here. There should be better tutorials out there to learn about setting up Spring to connect to a database. This assumes you have a PostgreSQL instance available on port 5432 of your machine.
2. Create Repository class
Let’s create the class we were missing earlier. All we need:
@Repository
interface EmployeeRepository extends JpaRepository<Employee, Long> {
}
We created a Repository which is an Interface inheriting from JpaRepository. From the type parameters, it detects that the ID is a Long, and it should manage Entities of the Employee Class.
3. Create CommandLineRunner to populate Database
We just created an Application with a REST API. It is serving information about all its employees at localhost:8080/employees.
All assuming we have a database up and running.
Having a database is only half the fun without any data.
For the sake of demonstrating I added a CommandLineRunner-Bean which uses the EmployeeRepository to initialize our TestData after the testing starts.
@Bean
public CommandLineRunner commandlineRunner(EmployeeRepository employeeRepository) throws Exception {

  return args -> {
    employeeRepository.deleteAllInBatch();
    ArrayList<Employee> employees = new ArrayList<>();
    employees.add(createEmployee("First", "Last"));
    employees.add(createEmployee("Mr.", "Frost"));
    employees.add(createEmployee("Santa", "Clause"));
    employees.add(createEmployee("Peter", "Pan"));
    employees.add(createEmployee("Cinder", "ella"));
    employees.add(createEmployee("What", "ever"));
    employeeRepository.saveAll(employees);
  };
}
What about the Test?
Yeah, finally we are going to test something! (Think I never ever heard these words spoken out loud 😉)
Add Integration Test
Thanks to our starter there is already a test. If we run the IntegrationtestApplicationTests class, we will see that they fail.
This is because of our latest addition of the database config.
The service under test tries to connect to the database to update the entity definition using hibernate. Due to no database being there - it fails to connect to the database.
If your test still turns out green, it might be that it connects to your local PostgreSQL database on your machine. After stopping the database instance, the test will end up red.
Adding TestContainers to the mix
Let’s get started and add the needed dependencies to the POM.
<properties>
  ...
  <testcontainers.version>1.11.2</testcontainers.version>
</properties>
  ...

<!--	Test Dependencies		-->
		<dependency>
			<groupId>org.testcontainers</groupId>
			<artifactId>testcontainers</artifactId>
			<version>${testcontainers.version}</version>
			<scope>test</scope>
		</dependency>
		<dependency>
			<groupId>org.testcontainers</groupId>
			<artifactId>postgresql</artifactId>
			<version>${testcontainers.version}</version>
			<scope>test</scope>
		</dependency>
Now that we have this, we can start to modify our existing Integrationtest. In order to setup Testcontainers we need to do the following:
- Add a
ClassRulefor starting a docker image with specific parameters - Add an Initializer which overrides the properties of our application with the ones of the testcontainer
Let’s have a look at the code:
@RunWith(SpringRunner.class)
@SpringBootTest
@ContextConfiguration(initializers = {IntegrationtestApplicationTests.Initializer.class})
public class IntegrationtestApplicationTests {

    @ClassRule
    public static PostgreSQLContainer postgres = new PostgreSQLContainer("postgres")
            .withDatabaseName("postgres")
            .withUsername("integrationUser")
            .withPassword("testPass");

    @Test
    public void contextLoads() {
    }

    static class Initializer
            implements ApplicationContextInitializer<ConfigurableApplicationContext> {
        public void initialize(ConfigurableApplicationContext configurableApplicationContext) {
            TestPropertyValues.of(
                    "spring.datasource.url=" + postgres.getJdbcUrl(),
                    "spring.datasource.username=" + postgres.getUsername(),
                    "spring.datasource.password=" + postgres.getPassword()
            ).applyTo(configurableApplicationContext.getEnvironment());
        }
    }
}
Feel free to run the tests again. Our Application context boots again and everything is green. Hooray!
Sadly, we didn’t verify anything. No surprise the test case is green.
What could we verify. Mhm … Let’s add a quick test which is verifying if we are able to fetch the testdata we write after each Application start.
...
@Autowired
EmployeeRepository employeeRepository;
...

@Test
public void testWriteToDb_afterBoot_shouldHaveEntries(){
    List<Employee> all = employeeRepository.findAll();
    Assertions.assertThat(all.size()).isEqualTo(6);
    Assertions.assertThat(all.get(0).getFirstName()).isEqualTo("First");
    Assertions.assertThat(all.get(0).getLastName()).isEqualTo("Last");
}
Close, but no cigar
We successfully tested that the test data got written. But what is an IntegrationTest without testing the whole service.
We should write a Test involving the REST-Controller we earlier created. Let’s add RestAssured for writing our tests and see if our RestController is giving us the correct data.
pom.xml

<dependency>
      <groupId>io.rest-assured</groupId>
      <artifactId>rest-assured</artifactId>
      <scope>test</scope>
</dependency>
You can read more about all the syntax RestAssured provides on the RestAssured page. I here just want to showcase how a REST API could be tested.
The test for our /employee endpoint:
- Replace the
@SpringBootTest-Annotation by@SpringBootTest(webEnvironment = SpringBootTest.WebEnvironment.RANDOM_PORT)since we need a real container with a Port for RestAssured - Inject the URL we will use for the endpoint:
@Value("http://localhost:${local.server.port}")
String baseUrl;
- Write the test
@Test public void testGet_returns_200_with_expected_employees() { when(). get(baseUrl + "/employees"). then() .statusCode(200) .body("size()", is(6)) .body("[0].firstName", equalTo("First")) .body("[0].lastName", equalTo("Last")); } - Run it - It will be green!
Recap:
We have written a simple service which is giving us back Data from a PostgreSQL Database.
In order to share this data with the world, we created a REST Controller listening on /employees/.
Even more important than that, we have written a good IntegrationTest which is using the exact Database which we will later use when deploying this service to production.
Our tests check if data got written to the Database itself and also if our Endpoint is giving the correct data.
When you do this in the future, you will probably also have POST, PUT and DELETE operations which make the tests a bit more interesting.
Hope this tutorial gave you a small idea on how you could leverage Docker, Testcontainers and RestAssured to properly test your next Service.
Again: All the code can be found HERE at the GitHub Repository.
About the Author: